How to Wire a Relay the Right Way. Different Types Explained
Author:admin Date: 2025-10-09 09:41 Views:415
Introduction
A relay is an electrically operated switch that allows a low-power signal to control a high-power circuit.
Due to the way a relay works, it is commonly found in many devices. Such includes automotive, industrial, and power systems.
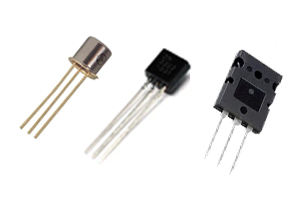
A relay comprises components such as an electromagnet, armature, moving contact, fixed contacts, and return spring. The relay operates by using an electromagnet to generate a magnetic field, which pulls an armature to activate the switch mechanism.
The operating mechanism of the relay enables the use of a small current to switch a large current load. The result is a safe and efficient method for isolating the control circuit from the power circuit. You can expect to encounter this type of system in many control systems and electronic devices.
Learning how to wire a relay can help ensure the circuit works correctly. This guide examines the wiring of various types of relays and ensures they are functioning correctly.
How to Wire Different Types of Relays: Step-by-Step Guide
Tools and Materials Required
Tools
- Screwdriver
- Wire strippers
- Crimping tools
- Multimeter
- Heat-shrinking tubing
Materials
- Relay
- Fuses
- Load device
- Power source
- Wires
How To Wire A 4 Pin Relay
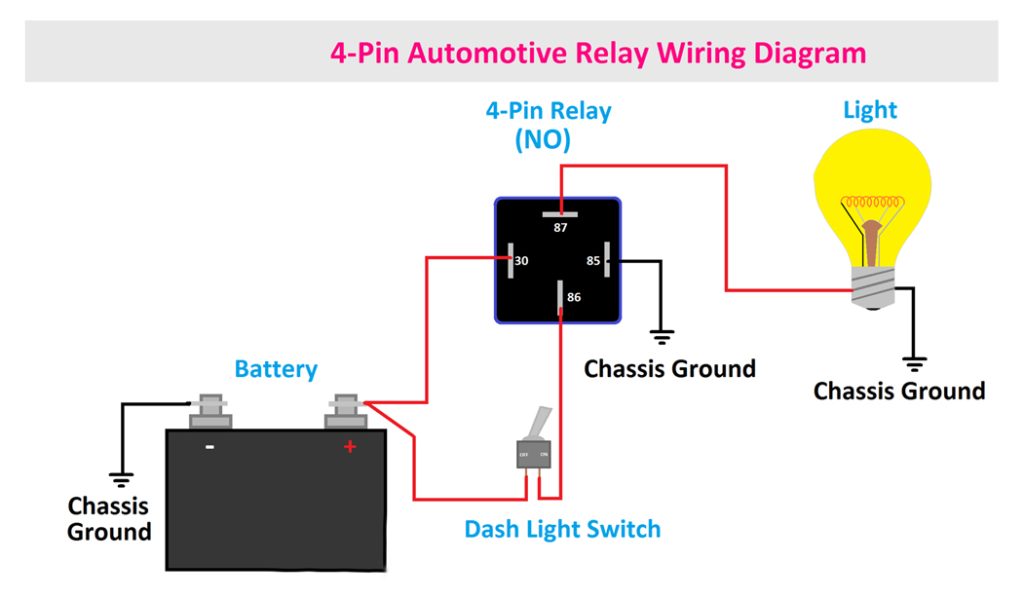
- Start by locating the pin numbers. Each pin number has a specific function, as you will find out later. The pins are numbered 30, 85, 86, 87.
- Connect to the power input, which is pin 30. Do this by running a wire from the positive terminal of a battery. You can include a fuse for circuit protection.
- Connect the relay ground, which is pin 85. Do this by connecting it to a solid part of the vehicle’s chassis or to the negative battery terminal.
- Wire pin 86 (trigger circuit) to the positive output of the low current switch. The switch controls the relay activation.
- Connect the positive wire of the component you want to power, such as a fan or light, to pin 87.
- Ground the accessory as well to ensure a good connection.
How To Wire A 5 Pin Relay
- The first step is to connect it to power. This involves connecting pin 30 to the positive terminal of the power source, typically a battery. An appropriately sized fuse can be included for additional protection.
- Connect pin 85 to the negative terminal and pin 86 to the switch. Also, connect to the other side of the switch to the positive terminal of the power source to provide a low-current control signal.
- In this case, there are normally open and normally closed outputs. You have to choose the output depending on the use.
- For a normally open (NO) output, connect pin 87 to the positive terminal of the device you want to power. This circuit will only receive power if the relay is activated.
- For the case of a normally closed (NC) output, connect pin 87a to the positive terminal of the device you need to power when the relay is not activated. When the relay is activated, the power switches from pin 87a to 87.
How To Wire A 6 Pin Relay

A 6-pin relay consists of two main components: a control coil and switch contacts.
The control coil has two pins, 85 and 86, that are energized by a low-voltage signal to activate the relay.
Regarding the switch contacts, you have the common, normally closed, and normally open contacts, as well as additional pins with special functions, depending on the model. Here is how you would wire it.
- Identify the pins by checking the specific pinout diagram of the relay
- Connect a low-voltage signal and ground wire to the control coil pins.
- Connect the load to the relay.
For the NO operation, connect the power source to the common terminal and then the load to the NO terminal.
For the NC operation, connect the power source to the common terminal and the device to the NC terminal. - Write the remaining pins depending on your application. Go ahead and test the connections with a low-power circuit to verify that they are working as expected and that the relay switches are activated correctly.
How To Wire An 8 Pin Relay
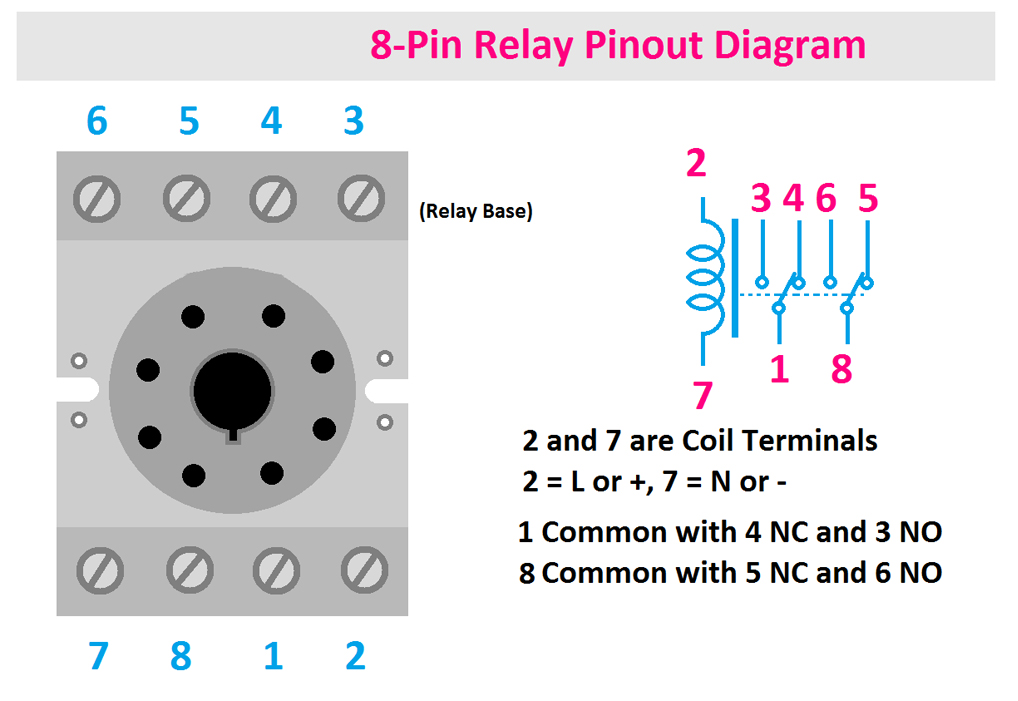
An 8-pin relay comes with multiple pins. This includes the coil pins, common pins, normally open (NO) pins and normally closed (NC) pins.
The coil pins are the input terminals for the control voltage. This is what is used to activate the relay. Pins 2 and 7 are the coil pins.
Common pins are the central terminals used for switching contacts. They have separate common points for the NC and NO contacts.
Normally open pins remain open when the coil is not energized and close upon energizing, thus completing the circuit.
Normally closed pins are closed when the coil is not energized and will open after energizing to break the circuit. Follow the steps below to wire an eight-pin relay.
- Identify the pins and their functions.
Pins 2 and 7 are for the coil
Pins 1 and 8 are the common contacts
Pins 3 and 6 are the NO contacts
Pins 4 and 5 are the NC contacts - Connect the positive control voltage to one of the coil pins and the negative to the other coil pin
- Wire the contact circuit according to the desired operation.
For the normally open operation, connect the load to one of the NO pins and then the power source to the corresponding common pin. This circuit only works when the relay is activated.
For the normally closed operation, connect the load of the circuit to one of the NC pins and then the power source to a corresponding common pin. This circuit is broken once the relay is activated.
Since the NO and NC circuits have to separate sets of contacts, it is possible to use both options for different parts of the circuit.
How To Wire A 11 Pin Relay
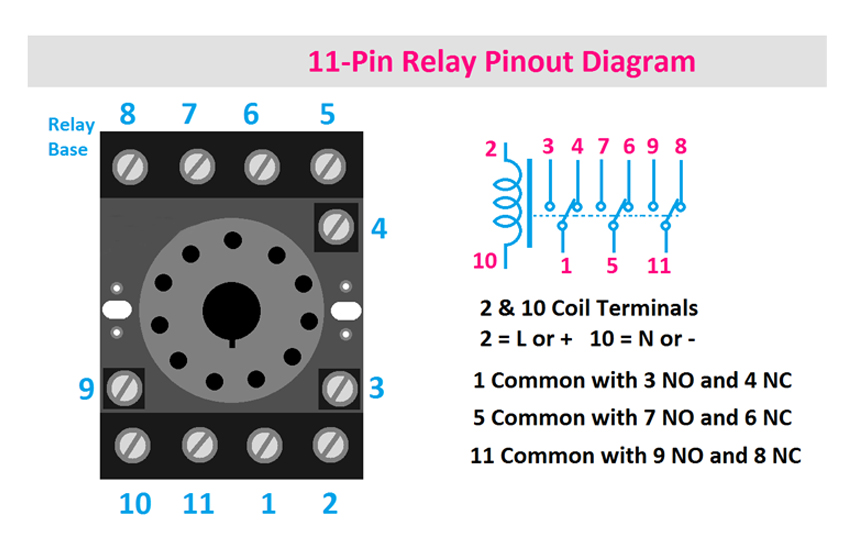
- Use the wiring diagram to understand what each pin does and how to wire correctly.
- Connect the correct voltage and polarity to the coil terminals. These are pins 2 and 10 or A1 and A2.
- Wire the control and load switches.
For example, we can do a simple ON/OFF switch by connecting the power source to one of the common terminals. Then connect the normally open contact to the load. Connect the other side of the load to the negative terminal. - Do not forget to ground the circuits for proper working and the safety of the loads and control circuits.
How To Wire A 14 Pin Relay
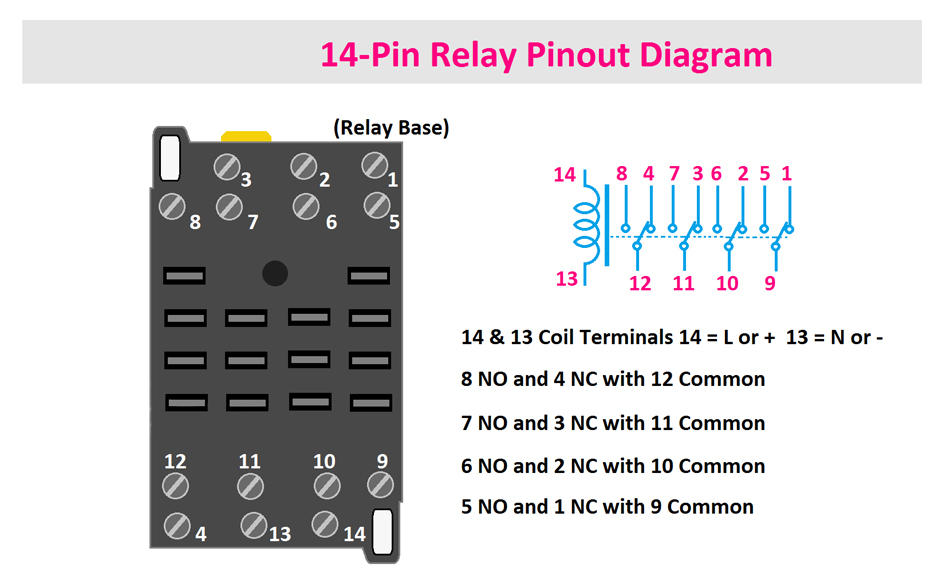
- For this relay type, you have two coil pins for control voltage. These are pins 13 and 14. Confirm with your relay’s wiring diagram. The contact pins are the remaining 12 pins, which are divided into common, normally open, and normally closed terminmals.
- The wiring diagram will guide you better on how to wire the specific relay in some distinct configurations.
- Start by connecting the control voltage to the coil pins and ground.
- Connect the load circuits. Identify the standard pins used to complete the NO and NC circuits. Connect to the NO pins and NC pins accordingly, depending on the circuit you want to achieve.
Safety Tips for Wiring a Relay
Now that you know how to wire a relay, below are important safety tips to keep in mind.
- Do not dismantle or drop the relay, as this may reduce the performance or result in burning.
- Make sure not to use relays in atmospheres that have inflammable or explosive gases. This is because the switching arcs or relay heating can potentially lead to an explosion or fire.
- Always check that all wires are securely crimped and screwed into the terminals correctly to avoid loose connections.
- Insulate connections by using heat shrink tubing to seal and protect them from short circuits and moisture.
- Before completing the circuit, verify the voltage when the switch is activated to ensure it is the correct amount.
- Perform tests under the conditions you intend to use the relay and confirm that your system is working correctly.
- Avoid overloading the relay as this may cause abnormal heating, fire, or contact welding.
How to Troubleshoot Relay Wiring Problems
Still on how to wire up a relay, there can be a few issues you encounter. These might make it hard for you to work with the relay. Here is how to troubleshoot wiring problems with a relay.
Visual Inspection
Inspect the relay and surrounding wires for physical damage. Look for signs of corrosion, loose connections, melting, or burning.
Verify the connections by ensuring that they are correctly secured and seated in the relay terminals.
Test the Relay Coil
Briefly apply power to the control pins to hear if the relay engages. This is heard through clicks in the relay once activated.
Also, use a multimeter to check the resistance in the control circuit pins. You need a resistance of around 50 to 200 ohms for an open line reading.
The multimeter is also useful for verifying that the circuit has the correct voltage required to activate it.
Test the Relay Contacts
Check the continuity of the contacts using a multimeter. There should not be continuity between the power and the load terminals since the relay is not active.
Now apply power to the control coil and check for continuity. There should be a beep or a low resistance reading indicating continuity between the load and power terminals.
Troubleshooting the External Circuit
If you have found that the relay is good, move to test the wiring or the other components of the circuit.
Verify that the load circuit has the right power with a good ground connection. Also, test the continuity to the load, making sure there are no shorts or breaks.
Conclusion
Looking at the process on how to wire relay, you will find that it is generally easy once you identify the pins and their respective functionality. Follow the wiring diagram provided by the relay manufacturer to understand how the relay operates. We have also shared various tips to follow when troubleshooting relays so that you can have the circuit working properly.
Video: How To Wire A Relay – Quick Tip
Please send RFQ , we will respond immediately.
Frequently Asked Questions
Can you wire a relay without a fuse?
Yes, but it is recommended to have a fuse in the power input line. This protects both the load and relay from short circuits and overcurrent.
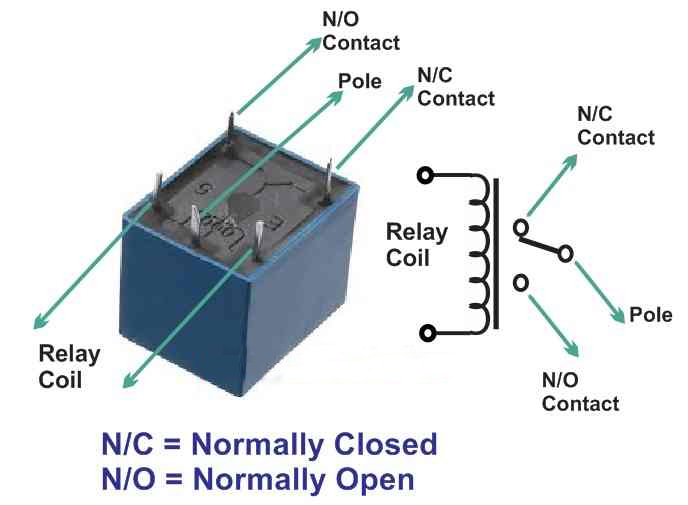
What is the difference between the NO and NC contacts in a relay?
The normally open circuit is OFF until the relay is activated, while the normally closed circuit is ON until the relay is activated.
How do you know the right voltage for the coil?
Check the label on the relay body as it clearly outlines the voltage system. It can be 12V, 24V, 110V, or 220V. Using the wrong voltage is not recommended as it may damage the relay.