
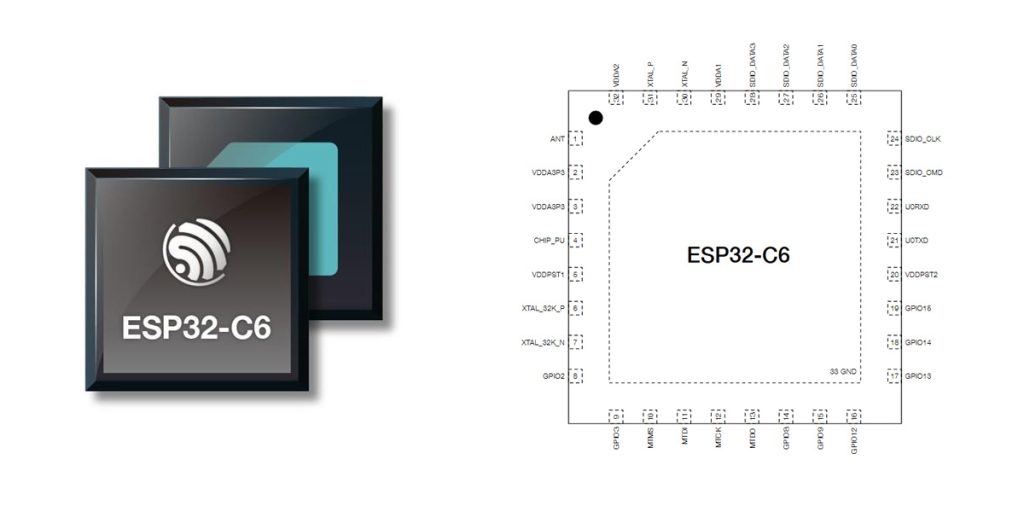
ESP32-C6 Pinout & Datasheet
- Type: TxRx Only
- Protocol: Bluetooth v5.0, Thread, Zigbee®
- Serial Interfaces: GPIO, I2C, I2S, IrDA, JTAG, PCM, PWM, SDIO, SPI, UART, USB
- Package: 40-VFQFN Exposed Pad


FREE delivery for orders over HK$250.00

Quick response, quick quotaton

Flash shipment,no worries after sales

Original channel,guarantee of the authentic products
ESP32 Guide 2024 | Choosing and Using an ESP32 Board
ESP32-C6
If you’re planning to use the ESP32-C6 chip in your next IoT project, you’ll definitely appreciate its powerful features. First, it supports Wi-Fi 6 (802.11ax), giving you speeds up to 150Mbps, reduced latency, and improved efficiency—perfect for real-time data transfers. Plus, it offers Bluetooth 5.3, including BLE and Mesh capabilities, so you can create low-power, broad-range connections effortlessly.
Under the hood, it’s powered by a 32-bit RISC-V processor running up to 160MHz, delivering solid performance while keeping power consumption minimal. Thanks to its advanced low-power modes, your battery-powered devices can run significantly longer. It also packs robust hardware encryption—handling AES, RSA, ECC, and more—to ensure your data stays secure.
With plenty of GPIO, SPI, UART, ADC, PWM, and I²C interfaces, you’ll easily expand your applications. This makes it ideal for smart homes, wearables, medical devices, industrial automation, and other consumer electronics, offering versatility for nearly any IoT scenario you might encounter.
esp32-c6 pinout diagram
| Pin Number | Pin Name | Function Description |
|---|---|---|
| 1 | GND | Ground |
| 2 | 3V3 | 3.3 V Power Input |
| 3 | EN | Chip enable pin, active high, resets chip if pulled low |
| 4 | IO4 | General-purpose I/O (GPIO4), supports ADC, PWM |
| 5 | IO5 | General-purpose I/O (GPIO5), supports ADC, PWM |
| 6 | IO6 | General-purpose I/O (GPIO6), supports ADC, PWM |
| 7 | IO7 | General-purpose I/O (GPIO7), supports ADC, PWM |
| 8 | IO8 | General-purpose I/O (GPIO8), supports ADC, PWM |
| 9 | IO9 | General-purpose I/O (GPIO9), supports ADC, PWM |
| 10 | IO10 | General-purpose I/O (GPIO10), supports ADC, PWM |
| 11 | IO11 | General-purpose I/O (GPIO11), supports ADC, PWM |
| 12 | IO12 | General-purpose I/O (GPIO12), supports ADC, PWM |
| 13 | IO13 | General-purpose I/O (GPIO13), supports ADC, PWM |
| 14 | IO14 | General-purpose I/O (GPIO14), supports ADC, PWM |
| 15 | IO15 | General-purpose I/O (GPIO15), supports ADC, PWM |
| 16 | IO16 | General-purpose I/O (GPIO16), supports ADC, PWM |
| 17 | IO17 | General-purpose I/O (GPIO17), supports ADC, PWM |
| 18 | IO18 | General-purpose I/O (GPIO18), supports ADC, PWM |
| 19 | IO19 | General-purpose I/O (GPIO19), supports ADC, PWM |
| 20 | IO20 | General-purpose I/O (GPIO20), supports ADC, PWM |
| 21 | IO21 | General-purpose I/O (GPIO21), supports ADC, PWM |
| 22 | IO22 | General-purpose I/O (GPIO22), supports ADC, PWM |
| 23 | IO23 | General-purpose I/O (GPIO23), supports ADC, PWM |
| 24 | IO24 | General-purpose I/O (GPIO24), supports ADC, PWM |
| 25 | IO25 | General-purpose I/O (GPIO25), supports ADC, PWM |
| 26 | IO26 | General-purpose I/O (GPIO26), supports ADC, PWM |
| 27 | IO27 | General-purpose I/O (GPIO27), supports ADC, PWM |
| 28 | IO28 | General-purpose I/O (GPIO28), supports ADC, PWM |
| 29 | IO29 | General-purpose I/O (GPIO29), supports ADC, PWM |
| 30 | IO30 | General-purpose I/O (GPIO30), supports ADC, PWM |
When you’re working with the ESP32-C6, here are a few things you should keep in mind to avoid issues. First, all GPIO pins run at 3.3V, so never directly connect them to 5V signals—otherwise, you risk frying the chip. Also, these GPIO pins can serve many functions like ADC, PWM, UART, SPI, or I²C, but you’ll need to configure them properly through your software before use.
Pay attention to special pins like IO0 and IO2, as they have specific roles during startup—using them incorrectly might prevent your board from booting. If you plan to use pins that require higher current, consider adding external drivers to keep things stable and safe.
Finally, don’t leave unused GPIO pins floating; it’s better to set them as inputs with internal pull-up or pull-down resistors. This simple step prevents unwanted noise and saves power. Follow these tips, and your ESP32-C6 projects will run smoothly.
esp32-c6 equivalent wifi module
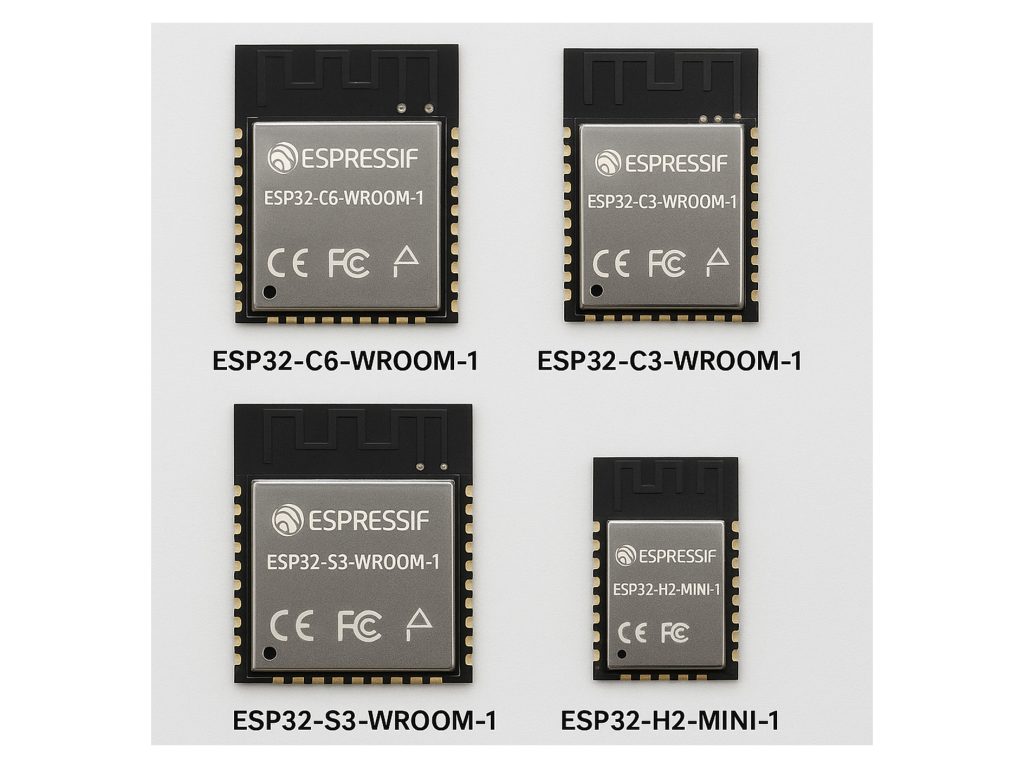
| Parameter | ESP32-C6-WROOM-1 | ESP32-C3-WROOM-1 | ESP32-S3-WROOM-1 | ESP32-H2-MINI-1 |
|---|---|---|---|---|
| Main CPU Architecture | Single-core RISC-V | Single-core RISC-V | Dual-core Xtensa LX7 | Single-core RISC-V |
| Wireless Protocol Support | Wi-Fi 6, BLE 5.0, Zigbee, Thread | Wi-Fi 4, BLE 5.0 | Wi-Fi 4, BLE 5.0 | BLE 5.2, Zigbee, Thread (No Wi-Fi) |
| Processor Frequency | 160 MHz | 160 MHz | 240 MHz | 96 MHz |
| SRAM Capacity | 512 KB | 400 KB | 512 KB | 320 KB |
| Flash Capacity | 4/8/16 MB | 4 MB | 4/8/16 MB | 2/4 MB |
| GPIO Count | 25 | 22 | 44 | 19 |
| Security Features | Secure Boot, Flash Encryption | Secure Boot, Flash Encryption | Secure Boot, Flash Encryption | Secure Boot, Flash Encryption |
| Typical Application Scenarios | Smart Home, Matter Devices | Low-power IoT Devices, Sensors | Image Recognition, Voice Processing | Low-power Mesh Networks, Sensors |
When you’re choosing an alternative to the ESP32-C6, there are a few key things you’ll want to think about. First, consider your wireless requirements. If your project specifically needs Wi-Fi 6, Thread, or Zigbee, you’re pretty much stuck with the ESP32-C6. But if standard Wi-Fi 4 and Bluetooth Low Energy (BLE) are enough, the ESP32-C3 or ESP32-S3 are great, cost-effective alternatives.
Next, think about performance versus power usage. If your application demands higher computing power, the dual-core ESP32-S3 is your best bet. But if battery life matters most and you need something ultra-low-power, the ESP32-H2 is ideal.
For GPIO availability, if you require plenty of pins, go for ESP32-S3. But if you’re working on a compact, budget-friendly design, the ESP32-C3 or ESP32-H2 could save you space and cost.
Lastly, all these modules offer secure boot and flash encryption. Just double-check flash capacity based on how complex your project is. Choose wisely, and your IoT projects will perform smoothly.
esp32-c6 iot circuit example

When you’re setting up your ESP32-C6 circuit, here’s what you need to know. The heart of it all is the ESP32-C6-FH4 chip—this gives you Wi-Fi 6, Bluetooth 5.0, and even Thread or Zigbee for reliable wireless connectivity.
Your 3.3V power line needs several filtering capacitors like C4, C5, C8, and others to keep the voltage stable and noise-free. Adding a small inductor (L1, around 2nH) helps further clean up high-frequency interference.
Make sure your crystal oscillator (around 40MHz with capacitors C21 and C22) sits close to the chip to keep your timing precise and stable.
For wireless performance, pay special attention to your antenna connection (ANT pin). Capacitors C1 and C17 handle impedance matching and antenna tuning, so placement matters a lot.
You’ve got plenty of GPIOs for connecting sensors or external modules, and don’t forget the status LED (D1) with resistor R5 to quickly check system status.
Keep the RF layout clean, power lines filtered, and the oscillator close—you’ll ensure smooth operation in smart home setups, industrial IoT, or wireless sensor networks.
esp32-c6 wifi 6 project tutorial
If you’re getting started with the ESP32-C6, here’s a simple rundown to get your project off the ground. First, grab a development board like the ESP32-C6-DevKitC-1, Pico, or Waveshare’s ESP32-C6-LCD-1.47, plus a USB Type-C cable. You might also want extras like an OLED display, LEDs, or sensors, depending on your project.
Next, set up your software. You can choose between ESP-IDF for more advanced control or Arduino IDE if you prefer something straightforward. With ESP-IDF, install according to Espressif’s official guides, configure your Wi-Fi settings in menuconfig, then customize and flash the provided Wi-Fi examples. Monitor your connection using idf.py monitor.
If Arduino IDE feels easier, download the latest version and add the ESP32-C6 board URL in Preferences. Then install ESP32-C6 support from the board manager, choose your board under Tools, modify an example Wi-Fi sketch to support Wi-Fi 6, and upload your code. Finally, use the serial monitor to check if your board successfully connects.
esp32-c6 arduino integration setup
If you’re looking to get your ESP32-C6 up and running using the Arduino IDE, here’s how you can do it quickly. First off, head over to the Arduino website and grab the latest IDE version. After installing it, open Arduino IDE, click on File > Preferences, and paste this URL into the Additional Boards Manager URLs field:
https://espressif.github.io/arduino-esp32/package_esp32_dev_index.json
Next, go to Tools > Board > Boards Manager, type “esp32” in the search box, and install the ESP32 library from Espressif Systems. Once that’s done, select your specific ESP32-C6 board from Tools > Board, such as “ESP32C6 Dev Module.”
Now connect your board to your computer using a USB cable. Under Tools > Port, pick the correct COM port that shows up for your board. Finally, load up a simple example sketch like Blink, hit upload, and you’re all set! Your ESP32-C6 is ready to go.
esp32-c6 antenna design guidelines
When you’re designing your ESP32-C6 PCB layout, the placement of your module and antenna area is crucial. Put the ESP32-C6 module near the board’s edge, ideally with the antenna section hanging slightly off the edge or very close to it. Keep the antenna region clear—no copper pours, wires, or components within about 15mm around it. If there’s a board directly underneath, try adding a slot or cutout to maintain good antenna performance.
For your RF traces, keep impedance at 50Ω consistently. Place a simple π-matching circuit near the chip, using a neat Z-shaped layout. RF traces should be short, uniform in width, and avoid sharp corners; opt for gentle curves or 135° angles. Ensure there’s a solid ground plane directly beneath RF lines and avoid routing signals underneath them.
Finally, keep your antenna away from noisy components like oscillators, USB, and UART lines. Using ground shields or via fencing around noisy lines helps reduce interference. Following these simple tips will help your ESP32-C6 run smoothly with reliable wireless connectivity.
More Like This

ESP-WROOM-32D
Espressif Systems

3165.D2WG18V
Intel
BCM43684C0KRFBG
Broadcom
ESP32-WROOM-32E
Olimex Ltd.

FM11NC08S
FUDAN MICRO

RTL8761ATV-CG
Realtek Semicon

AD9363BBCZ-REEL
Analog Devices

PT4318-X
PTC(Princeton Tech)
MT7612EN
MTK

SYN520R
Synoxo

RTL8703BS-CG
Realtek Semicon

CMT2110A-ESR
HopeRF Micro-electronics
Also Add to Cart
PT4318-X
PTC(Princeton Tech)

BGT24LTR11N16E6327XTSA1
Infineon Technologies

EFR32BG12P332F1024GL125-C
Silicon Labs
CSR8510A10-ICXR-R
Qualcomm

NRF52832-QFAB-R
Nordic Semiconductor ASA

LR1121IMLTRT
Semtech Corporation
RTL8304MB-CG
Realtek Semicon

ESP32-D2WD
Espressif Systems
RTL8188FTV-VC-CG
Realtek Semicon

ESP32-C6FH4
Espressif Systems
MT7612EN
MTK

RDA5807FP
RDA Microelectronics
Related Products
ESP-WROOM-32D
Espressif Systems
3165.D2WG18V
Intel
BCM43684C0KRFBG
Broadcom
ESP32-WROOM-32E
Olimex Ltd.
FM11NC08S
FUDAN MICRO
RTL8761ATV-CG
Realtek Semicon
AD9363BBCZ-REEL
Analog Devices
PT4318-X
PTC(Princeton Tech)
MT7612EN
MTK
SYN520R
Synoxo
RTL8703BS-CG
Realtek Semicon
CMT2110A-ESR
HopeRF Micro-electronics

RTL8812BU-CG
Realtek Semicon

RTL8822CS-VL-CG
Realtek Semicon
RTL8723DS-CG
Realtek Semicon

LT8920TSSK
NST Tech
RDA5807FP
RDA Microelectronics

MXL608-AG-T
MaxLinear

SYN510R
Synoxo

RTL8189ETV-CG
Realtek Semicon

RTL8761BTV-CG
Realtek Semicon

RTL8370MBI-CG
Realtek Semicon

SYN531R
Synoxo
RTL8304MB-CG
Realtek Semicon

CH9141K
WCH(Jiangsu Qin Heng)

RTL8189ES-VB-CG
Realtek Semicon

RTL8812BRH-CG
Realtek Semicon

RTL8189FTV-VC-CG
Realtek Semicon

SYN480R
Synoxo
MT7628NN
MTK
Please send RFQ , we will respond immediately.
